Attribute Based Access Control (ABAC): Enterprise Ready Implementation
Learn everything you need to know about Attribute Based Access Control (ABAC) and develop an enterprise application to show the practical implementation of ABAC using Permify and Go.
Access control systems are essential components that ensure information system security. These systems define who can or cannot access which resource and under which conditions such access is allowed. There are several models for access control systems traditionally, such as:
- Relationship Based Access Control (ReBAC)
- Role-Based Access Control (RBAC)
- Discretionary Access control (DAC)
However, as organizations increased in size, their demands for access control became more complex. Traditional access control models often failed to provide the necessary granularity and flexibility.
Over time, this deficiency spurred further development towards Attribute Based Access Control (ABAC). ABAC is a more dynamic and much finer-grained access control model that uses attributes to make access decisions.
In this guide, we will examine ABAC, its concepts, and its comparison with other policy models. We will also go over its benefits and pitfalls.
Furthermore, we will develop an enterprise application to show the practical implementation of ABAC using Permify and Go. This hands-on approach will make it easier to learn how ABAC is applied with modern development tools.
Table Of Contents
- What is ABAC?
- Key Components of ABAC
- ABAC vs. Other Policy Models
- ABAC vs. RBAC
- ABAC vs. ReBAC
- ABAC vs. DAC
- Benefits of ABAC
- Pitfalls of ABAC
- How to Implement ABAC in an Enterprise Application
- Designing the ABAC Model with Permify
- Implementing ABAC with Go using Permify
- Conclusion
Prerequisites
Before we get started, there are a few basic prerequisites you'll need:
- Programming with Go: You should be comfortable with Go, including basic syntax and data structures. Also, make sure Go is installed on your machine. If not, you can install it from the Go website.
- Postman: You should have Postman installed for testing APIs and endpoints. It's a useful tool for sending requests and analyzing responses during development.
- Git: You should have Git installed on your machine for version control.
What is ABAC?
 Attribute based Access Control (ABAC) is an access control model in which access rights are granted based on attributes. These attributes can be associated with users, resources, actions, and the environment. Unlike traditional access control models, ABAC provides a highly flexible and granular approach to access management.
In ABAC, you describe policies using various types of conditions, including boolean conditions, text/object based conditions, and numerical comparisons. These rules determine whether a user can access a resource based on specific attributes.
For instance, a policy might state that only a user belonging to a given role, accessing the system from a specific IP address, and during working hours can view a particular document. Another example could involve checking if an IP address includes a certain string or ensuring a transaction amount does not exceed a specified limit.
Key Components of ABAC
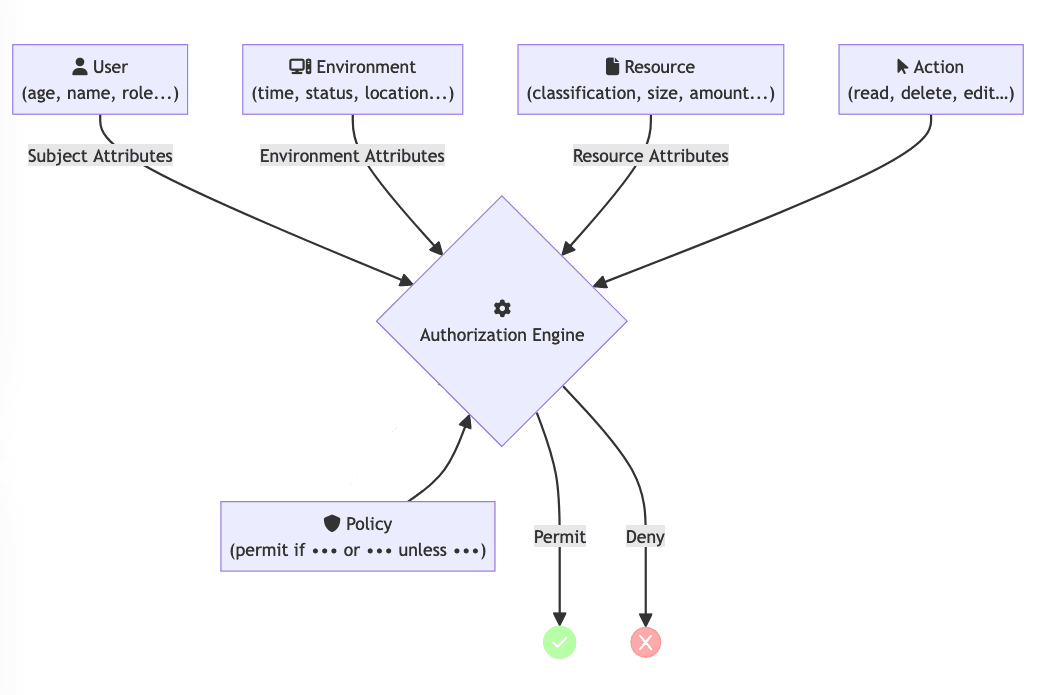
The core components of an ABAC system include:
- Subjects: These are the entities (usually users) requesting access to resources. Some example attributes of a subject include roles, organizational unit membership, security clearance level, and personal characteristics.
- Resources: The objects or entities that the subjects want to access. Resources can have attributes like type, classification, or ownership.
- Actions: The operations subjects desire or intend to perform on resources. Examples of an action are read, write, delete, and modify.
- Environment: Context-relevant information concerning the request for access. This describes information like attributes, which may be dependent on the environment the person is in. For example, time of day, location, IP address, etc.
ABAC vs. Other Policy Models
ABAC vs. RBAC
 Role-Based Access Control (RBAC) works by assigning access rights to predefined roles within an organization. Each role will be associated with a set of permissions. The users are assigned a role and inherit the permissions attached to that role.
While RBAC makes permission management easier by grouping users under roles, it does not offer flexibility in complicated, dynamic access requirements. ABAC, on the other hand, evaluates multiple attributes in real-time. Consequently it is able to make more fine-grained, context-sensitive access decisions when compared to RBAC.
ABAC vs. ReBAC

ReBAC focuses on relationships between entities and is a model often used in social networks or collaborative environments. While ReBAC can provide fine-grained control within the context of relationships, it is limited to the types of relationships it can define and manage. ABAC on the other hand, can include relationships as attributes, so it can become a broader and more flexible approach than the relatively narrow focus of ReBAC.
ABAC vs. DAC

Discretionary Access control (DAC) is a model in which the data owner decides who has access to their resources. This model provides a high degree of flexibility to the owner. However, DAC's reliance on an owner's decisions makes it highly prone to human errors and less adaptive to changing requirements. ABAC goes far beyond DAC by allowing consistent, secure access decisions that evolve as the contexts and policies change.
Benefits of ABAC
- Fine-Grained Access Control: ABAC supports very fine-grained access control policies that may consider many attributes and complex conditions.
- Context-Aware Security: ABAC can include context that is dynamic and situationally relevant at the time of enforcement of access decisions.
- Scalability: The great thing about ABAC is that it scales in enterprise settings because it does not depend on preconfigured roles; instead, new users can have attributes assigned when they are onboarded, and the attributes are evaluated when a request is made.
- Reduced Role Explosion: By using attributes in place of roles, ABAC avoids the problem of role explosion, where the number of roles could increase indefinitely.
Pitfalls of ABAC
- Policy Complexity: In many cases, ABAC's flexibility and granularity make it possible to have very complex policies, which makes them difficult to handle and understand.
- Performance Overhead: Evaluating the attributes and policies can impose additional performance overhead in an environment with high request volume.
- Interoperability Issues: It can be challenging to integrate ABAC into existing systems and applications, especially those developed while considering other access control models.
How to Implement ABAC in an Enterprise Application
Let's demonstrate how ABAC can be implemented in an enterprise application.
ABAC Example Scenario
Imagine you are developing an application for a particular company: an internal document management system. There will be a few employees from various departments and at different levels managing the documents in such a system. We only want some people to view, edit, and delete certain documents based on certain attributes.
The main components of our enterprise application are:
- User Authentication: The system will authenticate users and will fetch their roles and departments.
- Document Management: The user can upload new documents and classify them as confidential, internal, or public. Documents in the system should be viewed, edited, or deleted only by users of those departments to which the document belongs and according to the document classification.
The application's backend will utilize Go for the backend API and Permify to manage the ABAC policies.
Let's get started by designing the ABAC model with Permify.
Designing the ABAC Model with Permify
Understanding Permify
Permify is an open-source authorization service built to create authorization schemes. It lets you define your authorization model, store the associated authorization data in any database of choice, and interact with its API to process authorization queries from your applications.
We'll use Permify to structure all the ABAC logic for the document management system. This will involve defining entities, relations, and access control policies through Permify's schema language.
Setting Up Permify
Getting started with Permify is straightforward. Here's how you can set it up locally:
-
Install Docker: Ensure Docker is installed on your machine. You can download Docker from the official website.
-
Run Permify Server: Use the following command to run Permify on a local server:
docker run -p 3476:3476 -p 3478:3478 ghcr.io/permify/permify serveThis will start Permify with the default configuration settings:
- Port 3476 is utilized for the REST API service.
- Port 3478 is utilized for the GRPC Service.
- Authorization data is stored in memory.
-
Verify Permify Server: After the container is up and running, you can access the health check endpoint to check if the Permify server is working correctly.
Open Postman and send a GET request to
http://localhost:3476/healthz. You should get a response indicating that the service is healthy.

Defining the ABAC Schema
Now that Permify is up and running, let’s define our authorization schema.
We’ll use the Permify Playground to write and test our schema. It's an interactive tool that helps you define, test, and validate your Permify schema before deploying it.

Here’s the schema for our document management system:
entity user {}

entity document {
	relation owner @user
	attribute classification string
	attribute department string

	permission view = is_public(classification) or (is_internal(classification) and in_same_department(department, request.dept)) or (is_confidential(classification) and owner)
	permission edit = owner or (is_internal(classification) and in_same_department(department, request.dept))
	permission delete = owner
}

rule is_public(classification string) {
	classification == 'public'
}

rule is_internal(classification string) {
	classification == 'internal'
}

rule is_confidential(classification string) {
	classification == 'confidential'
}

rule in_same_department(department string, dept string) {
	department == dept
}
The schema is written in the Permify schema language and defines our application's entities, attributes, relations, and access control rules. Here’s a breakdown of each part of the schema:
-
Entities:
user: Represents the users of the system.document: Represents the documents with attributes and relations.
-
Attributes:
classification: Astringattribute that classifies the document (e.g., public, internal, confidential).department: Astringattribute indicating the department associated with the document.
-
Relations:
owner: A relation linking a document to its owning user.
-
Permissions:
view: Defines who can view the document. This permission is granted if any of the conditions are true:- The document classification is public.
- The document classification is internal, and the user is in the same department
- The document is confidential, and the user is the owner.
edit: Allows editing if the user is the owner or if the document is internal and the user is in the same department.delete: Permits deletion only if the user is the owner.
-
Rules:
is_public,is_internal,is_confidential: These rules check the classification of the document.in_same_department: This rule checks if the user's department matches the document's department.
Now that we have defined our ABAC schema, let's implement the policies in our Go application.
Implementing ABAC with Go using Permify
Step 1: Setting Up the Go Project
For our Go project, we'll use a starter template. It contains all the routes and authentication for our application so we can focus on adding the ABAC logic.
To get started, run the following commands:
git clone https://github.com/TropicolX/golang-abac-demo.git
cd golang-abac-demo
git checkout starter
go mod tidy
The project structure should look like the following:
golang-abac-demo/
├── cmd/
│   └── server/
│       └── main.go
├── internal/
│   ├── config/
│   │   └── config.go
│   ├── controllers/
│   │   ├── auth_controller.go
│   │   └── document_controller.go
│   ├── middlewares/
│   │   └── auth_middleware.go
│   ├── models/
│   │   ├── claims.go
│   │   ├── document.go
│   │   └── user.go
│   ├── utils/
│   │   ├── logger.go
│   │   └── string_utils.go
├── .gitignore
├── go.mod
├── go.sum
└── README.md
This structure organizes our project into different modules for configuration, controllers, middleware, models, and utilities. The cmd/server/main.go file serves as the entry point of our server.
Step 2: Initializing the Permify Client
Next, we need to initialize the Permify client using the Permify Go SDK. This is essential because the Permify client will handle communication with the Permify server, allowing us to enforce our authorization logic.
Navigate to internal/config directory, create a new file called permify_client.go, and add the following code to set up the client:
// internal/config/permify_client.go
package config

import (
	"context"
	"log"

	v1 "github.com/Permify/permify-go/generated/base/v1"
	permify "github.com/Permify/permify-go/v1"
	"google.golang.org/grpc"
	"google.golang.org/grpc/credentials/insecure"
)

var PermifyClient *permify.Client
var SchemaVersion string
var SnapToken string

func InitPermifyClient() {
	client, err := permify.NewClient(
		permify.Config{
			Endpoint: "localhost:3478",
		},
		grpc.WithTransportCredentials(insecure.NewCredentials()),
	)
	if err != nil {
		log.Fatalf("Failed to initialize Permify client: %v", err)
	} else {
		PermifyClient = client
		log.Println("Permify client initialized successfully")
	}
}
In the InitPermifyClient function, we create a new Permify client using the server’s endpoint (localhost:3478). If the initialization is successful, the client is stored in a global variable PermifyClient, and a success message is logged. If there's an error, it logs the error and stops the execution.
Step 3: Storing the Schema
After setting up the Permify client, we will upload our previously defined authorization schema to the Permify server. This step is vital because the schema outlines our access control rules, detailing who can do what under which conditions.
Navigate to internal/config/permify_client.go and add the following code:
// internal/config/permify_client.go
...

func WritePermifySchema() {
	// Write schema
	schema :=
	`
		entity user {}

		entity document {
			relation owner @user
			attribute classification string
			attribute department string

			permission view = is_public(classification) or (is_internal(classification) and in_same_department(department, request.dept)) or (is_confidential(classification) and owner)
			permission edit = owner or (is_internal(classification) and in_same_department(department, request.dept))
			permission delete = owner
		}

		rule is_public(classification string) {
			classification == 'public'
		}

		rule is_internal(classification string) {
			classification == 'internal'
		}

		rule is_confidential(classification string) {
			classification == 'confidential'
		}

		rule in_same_department(department string, dept string) {
			department == dept
		}
    `

	sr, err := PermifyClient.Schema.Write(context.Background(), &v1.SchemaWriteRequest{
		TenantId: "t1",
		Schema:   schema,
	})

	if err != nil {
		log.Fatalf("Failed to write schema: %v", err)
	}

	SchemaVersion = sr.SchemaVersion
	log.Printf("Schema version %s written successfully", SchemaVersion)

}
In the above snippet, we define a function WritePermifySchema and add the code to send the schema to the Permify server. If successful, the server returns a schema version, which we log and store.
Step 4: Syncing Relationships and Attributes
After writing our schema, we need to ensure that Permify's authorization data is in sync with the data in our backend. For some context, this is the current data we have for our users and documents:
// internal/models/user.go
...
var Users = []User{
	{ID: "1", Username: "admin", Password: "adminpassword", Role: "admin", Department: "IT"},
	{ID: "2", Username: "hrmanager", Password: "hrpassword", Role: "manager", Department: "HR"},
	{ID: "3", Username: "salesstaff", Password: "salespassword", Role: "staff", Department: "Sales"},
	{ID: "4", Username: "itstaff", Password: "itpassword", Role: "staff", Department: "IT"},
}
...

// internal/models/document.go
...
var Documents = []Document{
	{ID: "1", Title: "Document 1", Content: "This is document 1", Classification: "public", OwnerID: "1"},
	{ID: "2", Title: "Document 2", Content: "This is document 2", Classification: "internal", OwnerID: "2"},
	{ID: "3", Title: "Document 3", Content: "This is document 3", Classification: "confidential", OwnerID: "3"},
	{ID: "4", Title: "Document 4", Content: "This is document 4", Classification: "internal", OwnerID: "4"},
}
...
Based on the data above, we see that:
- User with ID
1from theITdepartment owns Document1which is classified aspublic. - User with ID
2from theHRdepartment owns Document2which is classified asinternal. - User with ID
3from theSalesdepartment owns Document3which is classified asconfidential. - User with ID
4from theITdepartment owns Document4which is classified asconfidential.
Permify stores authorization data using relationships (relations between our entities) and attributes. Using our current data, we can easily define the initial relationships and attributes.
However, instead of manually adding them, we'll implement a sync function. This function will compare the data in our backend with the authorization data in Permify and make necessary adjustments. This approach ensures that our initial access control data is always up-to-date and reduces the risk of errors.
Add the following code to internal/config/permify_client.go:
// internal/config/permify_client.go
...
import (
	"context"
	"golang-abac-demo/internal/models"
	"golang-abac-demo/internal/utils"
	"log"
    ...
)

...

func SyncPermify() {
	// Read current relationships from Permify
	rr, err := PermifyClient.Data.ReadRelationships(context.Background(), &v1.RelationshipReadRequest{
		TenantId: "t1",
		Metadata: &v1.RelationshipReadRequestMetadata{
			SnapToken: SnapToken,
		},
		Filter: &v1.TupleFilter{
			Entity: &v1.EntityFilter{
				Type: "document",
			},
			Subject: &v1.SubjectFilter{
				Type: "user",
			},
		},
	})

	if err != nil {
		log.Fatalf("Failed to read relationships from Permify: %v", err)
	}

	// Map of existing document IDs in Permify
	existingDocumentIDs := make([]string, 0)
	nonExistingDocumentIDs := make([]string, 0)

	for _, tuple := range rr.Tuples {
		if tuple.Entity.Type == "document" {
			_, err := models.GetDocumentByID(tuple.Entity.Id)

			if err != nil {
				nonExistingDocumentIDs = append(nonExistingDocumentIDs, tuple.Entity.Id)
			} else {
				existingDocumentIDs = append(existingDocumentIDs, tuple.Entity.Id)
			}
		}
	}

	// Delete documents that don't exist in the database
	if len(nonExistingDocumentIDs) > 0 {
		rr, err := PermifyClient.Data.Delete(context.Background(), &v1.DataDeleteRequest{
			TenantId: "t1",
			TupleFilter: &v1.TupleFilter{
				Entity: &v1.EntityFilter{
					Type: "document",
					Ids:  nonExistingDocumentIDs,
				},
			},
			AttributeFilter: &v1.AttributeFilter{
				Entity: &v1.EntityFilter{
					Type: "document",
					Ids:  nonExistingDocumentIDs,
				},
				Attributes: []string{"classification", "department"},
			},
		})

		if err != nil {
			log.Fatalf("Failed to delete orphaned documents from Permify: %v", err)
		}

		SnapToken = rr.SnapToken
		log.Printf("Orphaned documents deleted from Permify successfully\nSnap token: %s", SnapToken)

	} else {
		log.Println("No orphaned documents to delete from Permify")
	}

	// Add missing documents to Permify
	var tuples []*v1.Tuple
	var attributes []*v1.Attribute

	for _, doc := range models.Documents {
		if !utils.ContainsString(existingDocumentIDs, doc.ID) {
			tuples = append(tuples, &v1.Tuple{
				Entity: &v1.Entity{
					Type: "document",
					Id:   doc.ID,
				},
				Relation: "owner",
				Subject: &v1.Subject{
					Type: "user",
					Id:   doc.OwnerID,
				},
			})

			user, err := models.GetUserByID(doc.OwnerID)

			if err != nil {
				log.Fatalf("Failed to fetch user by ID: %v", err)
			}

			attributes = append(attributes, []*v1.Attribute{
				{
					Entity: &v1.Entity{
						Type: "document",
						Id:   doc.ID,
					},
					Attribute: "classification",
					Value:     utils.ConvertStringToAny(doc.Classification),
				},
				{
					Entity: &v1.Entity{
						Type: "document",
						Id:   doc.ID,
					},
					Attribute: "department",
					Value:     utils.ConvertStringToAny(user.Department),
				},
			}...)
		}
	}

	// Write missing documents to Permify
	if len(tuples) > 0 {
		rr, err := PermifyClient.Data.Write(context.Background(), &v1.DataWriteRequest{
			TenantId: "t1",
			Metadata: &v1.DataWriteRequestMetadata{
				SchemaVersion: SchemaVersion,
			},
			Tuples:     tuples,
			Attributes: attributes,
		})

		if err != nil {
			log.Fatalf("Failed to write missing documents to Permify: %v", err)
		}

		SnapToken = rr.SnapToken
		log.Printf("Missing documents written successfully\nSnap token: %s", SnapToken)
	} else {
		log.Println("No missing documents to write to Permify")
	}

	log.Println("Permify synced successfully")
}
In the above snippet:
- Read Relationships: We read the current relationships from Permify.
- Map Document IDs: We create a map of existing document IDs in Permify and identify non-existing document IDs that should be deleted.
- Delete Non-Existing Documents: We delete documents from Permify that no longer exist in the database.
- Add Missing Documents: We add documents that exist in the database but are missing in Permify, including their relationships and attributes.
Note: In a real-world application, you would typically retrieve the data from a database rather than defining it statically. You would also typically run this sync function periodically or trigger it when significant changes occur in your database.
So far, we've implemented a sync function that runs when the server initially loads. However, we also need to sync the authorization data in response to user actions. For example, if a user uploads a new document, we would need to update Permify with the corresponding relationships and attributes.
Navigate to internal/controllers/document_controller.go and add the following code:
// internal/controllers/document_controller.go
package controllers

import (
	"context"
	"encoding/json"
	"golang-abac-demo/internal/config"
	"golang-abac-demo/internal/models"
	"golang-abac-demo/internal/utils"
	"log"
	"net/http"
	"strconv"

	v1 "github.com/Permify/permify-go/generated/base/v1"
	"github.com/gorilla/mux"
)

func UploadDocument(w http.ResponseWriter, r *http.Request) {
	...
	// Add document to repository (this would be replaced with actual DB call)
	models.AddDocument(doc)

	// Add document to Permify
	tuples := []*v1.Tuple{{
		Entity: &v1.Entity{
			Type: "document",
			Id:   doc.ID,
		},
		Relation: "owner",
		Subject: &v1.Subject{
			Type: "user",
			Id:   user.ID,
		},
	}}

	attributes := []*v1.Attribute{
		{
			Entity: &v1.Entity{
				Type: "document",
				Id:   doc.ID,
			},
			Attribute: "classification",
			Value:     utils.ConvertStringToAny(doc.Classification),
		},
		{
			Entity: &v1.Entity{
				Type: "document",
				Id:   doc.ID,
			},
			Attribute: "department",
			Value:     utils.ConvertStringToAny(user.Department),
		},
	}

	_, err = config.PermifyClient.Data.Write(context.Background(), &v1.DataWriteRequest{
		TenantId: "t1",
		Metadata: &v1.DataWriteRequestMetadata{
			SchemaVersion: config.SchemaVersion,
		},
		Tuples:     tuples,
		Attributes: attributes,
	})

	if err != nil {
		w.WriteHeader(http.StatusInternalServerError)
		json.NewEncoder(w).Encode(map[string]string{"error": "Failed to write relationship to Permify"})
		return
	}

	utils.InfoLogger.Printf("User '%s' uploaded document %s", user.Username, doc.ID)

	...
}

...

func DeleteDocument(w http.ResponseWriter, r *http.Request) {
	...
	// Delete document from repository (this would be replaced with actual DB call)
	models.DeleteDocument(docID)

	// Delete document from Permify
	_, err = config.PermifyClient.Data.Delete(context.Background(), &v1.DataDeleteRequest{
		TenantId: "t1",
		TupleFilter: &v1.TupleFilter{
			Entity: &v1.EntityFilter{
				Type: "document",
				Ids:  []string{doc.ID},
			},
		},
		AttributeFilter: &v1.AttributeFilter{
			Entity: &v1.EntityFilter{
				Type: "document",
				Ids:  []string{doc.ID},
			},
			Attributes: []string{"classification", "department"},
		},
	})

	if err != nil {
		w.WriteHeader(http.StatusInternalServerError)
		json.NewEncoder(w).Encode(map[string]string{"error": "Failed to delete document from Permify"})
		return
	}

	utils.InfoLogger.Printf("User '%s' deleted document %s", claims.Username, doc.ID)
	...
}
In the above snippet:
- Uploading Documents: When a document is uploaded, it’s added to our repository and its relationships and attributes are written to the Permify server. This ensures that Permify is aware of the new document and can enforce access control based on the defined policies.
- Deleting Documents: When a document is deleted, it’s removed from both the repository and Permify. This ensures that access control rules no longer apply to the deleted document.
Step 5: Setting Up the Middleware for Access Checks
Let’s set up a middleware to handle access checks. This middleware function will intercept requests and perform necessary checks before allowing them to proceed. This is crucial for enforcing access control policies based on user attributes and request context.
Create an abac_middleware.go file in the internal/middlewares directory and add the following code:
// middlewares/abac_middleware.go

package middlewares

import (
	"context"
	"log"
	"net/http"

	"golang-abac-demo/internal/config"
	"golang-abac-demo/internal/controllers"
	"golang-abac-demo/internal/models"

	v1 "github.com/Permify/permify-go/generated/base/v1"
	"github.com/gorilla/mux"
	"google.golang.org/protobuf/types/known/structpb"
)

func ABACMiddleware(permission string) mux.MiddlewareFunc {
	return func(next http.Handler) http.Handler {
		return http.HandlerFunc(func(w http.ResponseWriter, r *http.Request) {
			claims := r.Context().Value(controllers.UserKey).(*models.Claims)
			username := claims.Username
			user, err := models.GetUserByUsername(username)

			if err != nil {
				log.Printf("Failed to fetch user: %v", err)
				http.Error(w, "Forbidden", http.StatusForbidden)
				return
			}

			vars := mux.Vars(r)
			documentID := vars["id"]

			// check if document exists
			_, docErr := models.GetDocumentByID(documentID)

			if docErr != nil {
				log.Printf("Failed to fetch document: %v", docErr)
				http.Error(w, "Document not found", http.StatusNotFound)
				return
			}

			data := map[string]interface{}{
				"dept": user.Department,
			}

			structData, err := structpb.NewStruct(data)

			if err != nil {
				log.Fatalf("Failed to create protobuf struct: %v", err)
			}

			cr, err := config.PermifyClient.Permission.Check(context.Background(), &v1.PermissionCheckRequest{
				TenantId: "t1",
				Metadata: &v1.PermissionCheckRequestMetadata{
					SnapToken: config.SnapToken,
					Depth:     50,
				},
				Entity: &v1.Entity{
					Type: "document",
					Id:   documentID,
				},
				Permission: permission,
				Subject: &v1.Subject{
					Type: "user",
					Id:   user.ID,
				},
				Context: &v1.Context{
					Data: structData,
				},
			})

			if err != nil {
				log.Printf("Failed to check permission: %v", err)
				http.Error(w, "Forbidden", http.StatusForbidden)
				return
			}

			if cr.Can == v1.CheckResult_CHECK_RESULT_ALLOWED {
				next.ServeHTTP(w, r)
				return
			}

			log.Printf("Permission denied")
			http.Error(w, "Forbidden", http.StatusForbidden)
		})
	}
}
In the above snippet:
- Extract User and Document ID: The middleware extracts user information from the request context and the document ID from the URL.
- Check Document Existence: It verifies if the document exists in the database.
- Context Creation: Creates a context object with user data, like their department, which is necessary for evaluating access control rules.
- Permission Check: Calls Permify to check if the user has the required permission (e.g., "view", "edit," or "delete") for the document.
- Handle Permission Result: If the user has permission, the request proceeds. Otherwise, it returns a "Forbidden" response.
And with that, we have all the components we need to implement ABAC in our application.
Step 6: Putting It All Together
Let's bring all the pieces together in our main.go file. We'll set up the new application flow and use middleware to handle access checks.
Add the following code to cmd/server/main.go:
// cmd/server/main.go
...

func main() {
	// Load configuration
	config.LoadConfig()

	// Initialize Permify client
	config.InitPermifyClient()

	// Write Permify schema
	config.WritePermifySchema()

	// Sync Permify with the database
	config.SyncPermify()

    ...
    api.HandleFunc("/documents", controllers.UploadDocument).Methods("POST")
	api.Handle("/documents/{id}", middlewares.ABACMiddleware("view")(http.HandlerFunc(controllers.ViewDocument))).Methods("GET")
	api.Handle("/documents/{id}", middlewares.ABACMiddleware("edit")(http.HandlerFunc(controllers.EditDocument))).Methods("PUT")
	api.Handle("/documents/{id}", middlewares.ABACMiddleware("delete")(http.HandlerFunc(controllers.DeleteDocument))).Methods("DELETE")
    ...
}
In this snippet:
- We load our configuration.
- Initialize the Permify client.
- Write the authorization schema to Permify.
- Sync Permify with the database to add initial relationships and attributes.
- Set up routes with middleware to handle access control.
Testing Our Implementation
Now that we have everything set up, let's put our implementation to the test. Firstly, let's run our server using the following command:
go run cmd/server/main.go

Next, we'll use Postman to simulate various user interactions with the application and verify that our access control policies are correctly enforced. Here's a step-by-step guide:
Step 1: Logging In
First, we need to log in to obtain authentication tokens for our users. These tokens will be used in subsequent requests to authenticate the users.
-
Open Postman.
-
Create a new POST request to
http://localhost:8080/login. -
Set the request body to raw JSON and enter the login credentials:
{ "username": "admin", "password": "adminpassword" } -
Send the request and note the token returned in the response. This token will be used in the Authorization header for subsequent requests.

Repeat this process for the other users (hrmanager and salesstaff) to get their respective tokens.
Step 2: Uploading a Document
Next, we'll test uploading a document:
-
Create a new POST request to
http://localhost:8080/api/documents. -
Set the request headers:
Authorization: Bearer <admin_token>Content-Type: application/json
-
Set the request body to raw JSON:
{ "title": "Document 5", "content": "This is document 5", "classification": "internal" } -
Send the request and check the response to ensure the document is added successfully.

Step 3: Viewing a Document
Let's test viewing a document to verify that the middleware checks the permission correctly:
- Create a new GET request to
http://localhost:8080/api/documents/2. - Set the request headers:
Authorization: Bearer <admin_token>
- Send the request and check the response. As an IT admin, you should not be allowed to view Document
2(internal, owned byhrmanager) because you are not a member of the HR department.

Step 4: Editing a Document
We'll now test editing a document to ensure only authorized users can make changes:
-
Create a new PUT request to
http://localhost:8080/documents/3. -
Set the request headers:
Authorization: Bearer <admin_token>Content-Type: application/json
-
Set the request body to raw JSON:
{ "title": "Updated Document 4", "content": "This is the updated content of document 4" } -
Send the request and check the response. As an admin, you should have permission to edit Document
4(internal, owned byitstaff) since you are a member of the IT department.

Step 5: Deleting a Document
Finally, we'll test deleting a document to ensure only users with the right permissions can delete it:
- Create a new DELETE request to
http://localhost:8080/api/documents/1. - Set the request headers:
Authorization: Bearer <admin_token>
- Send the request and check the response. Since the admin is the owner, this should be allowed.

You can repeat similar steps for the other users (hrmanager and salesstaff) to test different scenarios:
- View Document: Attempt to view documents they own and those they don't to ensure proper access control.
- Edit Document: Try editing documents they should have permission to edit and those they shouldn't.
- Delete Document: Test deleting documents they own versus those they don't.
By following these steps, you can ensure that your ABAC implementation with Permify and Go is functioning correctly and securely controlling access to your documents.
Conclusion
In this article, we explored ABAC and how it can be implemented in an enterprise setting. We also looked at how ABAC enables fine-grained, dynamic control over who can do what with resources based on various attributes.
Using Permify made defining and managing such policies quickly done in a way that works seamlessly with our Go application. Following the steps outlined here, you can apply powerful ABAC policies of your own to projects.
The complete code for this project can be found in this GitHub Repo.